Leaking After Replacement? How to Install a Shower Head Correctly
Swapped the head and now it drips at the joint? The fix is almost always in the prep: clean threads, the right seal, and gentle tightening. This Garbage Advice guide shows how to install a shower head without leaks on the first try—whether you’re upgrading to a rain head or adding a handheld. You’ll stage a small toolkit, remove the old head without damaging finishes, refresh seals with thread seal tape (also called plumber’s or PTFE/Teflon tape), and test methodically. We’ll also pinpoint leak causes and when a persistent drip means the shower valve—not the head—needs service. Done carefully, the job takes 10–20 minutes and prevents wasted water and rework.
What causes leaks after a shower head replacement
Most post-install drips trace to one of these: improper thread sealing, a missing or flattened rubber washer/O-ring, mineral buildup on threads, cross-threading, overtightening, or a cracked plastic fitting. Installation checkpoints to eliminate the usual suspects:
- Wrap PTFE tape correctly: wrap the shower-arm threads 2–3 turns clockwise for a watertight seal (see wrap PTFE tape 2–3 turns clockwise: https://www.homeaglow.com/hub/content/how-to-install-a-shower-head).
- Confirm the gasket: make sure the rubber washer is present and seated before tightening (see rubber washer is present and seated: https://www.taskrabbit.com/blog/how-to-install-shower-head/).
- Start by hand and don’t overdo it: hand-start the threads to avoid damage, then tighten to a firm handshake using a protected wrench only if needed (see tighten to a firm handshake using a protected wrench: https://www.nytimes.com/wirecutter/reviews/advice-install-showerhead/).
If leaks persist after proper cleaning and new washers, the shower valve may be failing and needs service (see leaks after cleaning and new washers may indicate a failing valve: https://www.lowes.com/n/how-to/fix-leaky-showerhead).
“Cross-threading” is when threads on two parts engage at a misaligned angle, damaging grooves and preventing a proper seal. It often causes immediate leaks and can permanently mar plastic or soft-metal fittings. Prevent it by hand-starting fittings straight and backing off if resistance feels gritty.
Tools and materials you need
Have everything within reach so the job goes quickly:
- Adjustable wrench or pliers
- Soft cloth or tape to protect finishes
- Thread seal tape (PTFE/plumber’s/Teflon tape)
- Replacement washers/O-rings (common sizes)
- Penetrating oil
- Small brush or toothbrush
- White vinegar
- Towel or small bucket for drips
- Drain cover or strainer (to catch dropped parts)
Garbage Advice do/don’t quick notes:
- Do wrap a cloth around finished surfaces before using tools, and hold the shower arm steady if you apply leverage to avoid twisting it in the wall.
- Don’t overtighten—hand-tight plus a small nudge is plenty for most installs.
Mini kit for speed: PTFE tape, two spare washers/O-rings, cloth, brush, small vinegar cup, penetrating oil, towel, drain cover.
Step 1: Shut off water and prep the area
You don’t always need to shut off the home’s main water; turning the shower valve fully off usually suffices. Some pros still use a main or isolation valve as a precaution, especially if fittings look corroded. Place a towel or bucket, cover the drain, and keep a cloth handy for drips. Briefly open the shower to relieve pressure, then close it.
Definition: An isolation valve is a localized shutoff controlling water to one fixture; using it limits disruption and reduces splash risk during repairs.
Step 2: Remove the old shower head safely
Try by hand first—many heads break free without tools. If stuck, apply penetrating oil at the joint and wait 10–15 minutes. Mineral buildup? Soak a cloth in vinegar and wrap the joint; for brass, gold, or nickel finishes, about 30 minutes is a safe starting point, while other finishes may need longer. Protect finishes: wrap a cloth around the head and arm before using tools. Hold the shower arm (cloth-wrapped) with pliers while turning the head with a wrench so you don’t stress or loosen the arm in the wall.
Step 3: Clean and inspect the shower arm threads
Brush off old tape and mineral residue until the grooves are clean. Inspect for burrs, cracks, or flattened threads; no amount of tape will stop a leak from a cracked fitting—replace damaged parts. Heavy limescale? Soak/scrub with vinegar to restore clean grooves that accept tape evenly.
Step 4: Check and replace washers or O-rings
Look inside the shower head or hose fitting: the rubber washer or O-ring should be present, pliable, and seated flat. Replace worn or missing gaskets; bring the old one to the store to match size precisely. Definition: A rubber washer/O-ring is a compressible gasket that seals the joint between threaded parts; age, heat, and overtightening can flatten or crack it, leading to persistent drips until replaced.
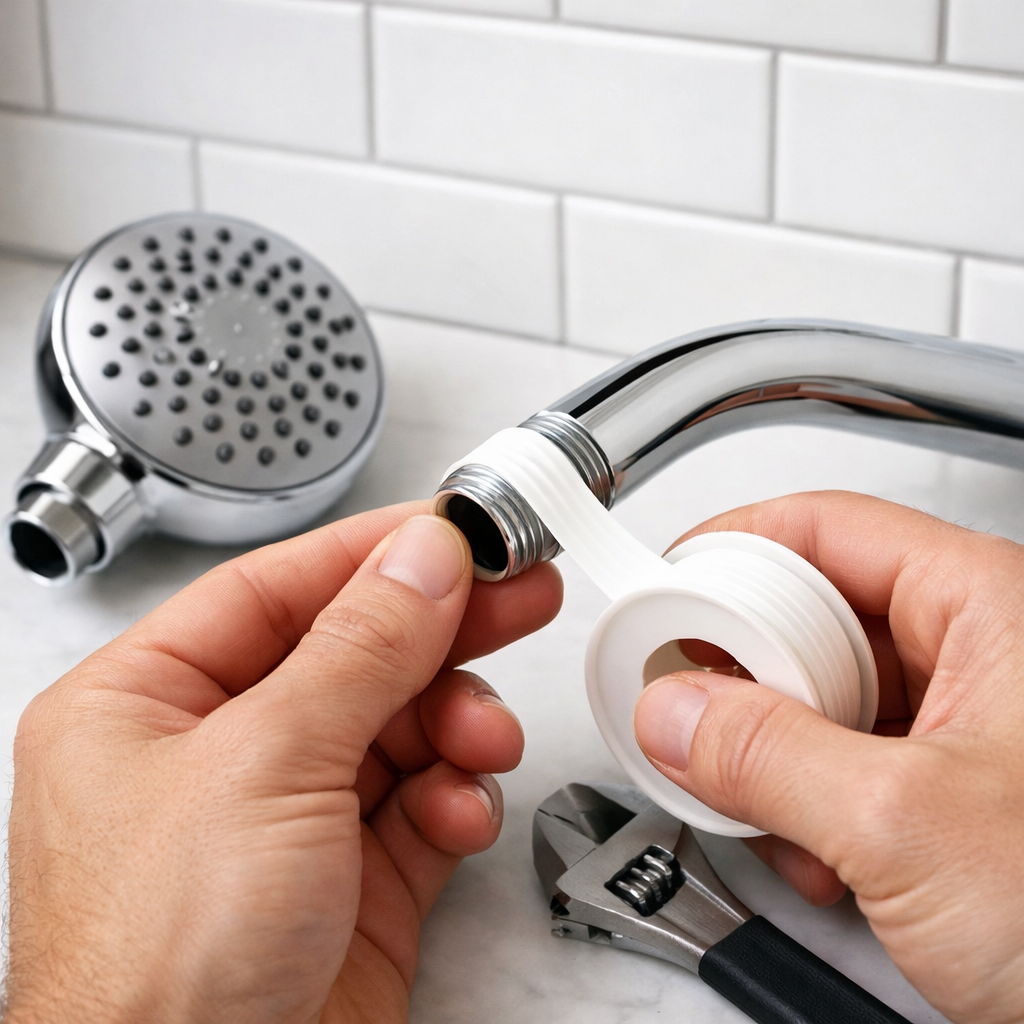
Step 5: Wrap thread seal tape the right way
Wrap 2–3 clockwise turns of thread seal tape on the shower-arm threads, starting near the wall and pressing tape firmly into the grooves. Keep tape off the very first thread if the new head uses a flat washer as the primary seal to help it seat squarely. Don’t overuse tape—too much can prevent proper seating or even crack plastic fittings. Some shower heads specifically say “no tape”; check your instructions.
Step 6: Install and tighten the new shower head
Hand-thread the head straight to prevent cross-threading. Hand-tighten fully, then—only if needed—give it a small wrench nudge while protecting the finish with a cloth. Use a “firm handshake” level of force to avoid crushing gaskets or stripping threads. For fixed heads, don’t worry about perfect angle until after testing; you can fine-tune later.
Step 7: Turn on water, test, and fine-tune
Turn water on slowly and watch the connection as water runs. If you see a bead or spray, turn water off, reapply tape and/or reseat the washer, then retest until dry. After installing, run the shower for about a minute to flush any debris or packaging dust from the new head. Optional: Check flow by timing how long it takes to fill a measured bucket; confirm it aligns with the head’s rated flow and that pressure feels right.
Quick fixes for common installation mistakes
- Water spraying from the joint: redo PTFE tape with 2–3 clockwise wraps pressed into the threads and confirm the washer is flat and seated.
- Still leaking: replace worn washers/O-rings inside the connection; persistent leaks after cleaning and new washers may indicate a failing valve.
- Overdid it: back off on torque and tape—overtightening or excess tape can deform gaskets or crack plastic. Some models specify no tape; follow the manufacturer.
Special notes for handheld, combo, and rain heads
- Handheld kits: tape the shower arm, attach the mount/diverter, then connect the hose to both ends; ensure rubber washers are inside both hose fittings before tightening.
- Combo/dual: install the diverter on the arm first, then add the fixed head and the hose per the kit’s sequence (see install the diverter on the arm first: https://en.cobbe.com/blogs/buying-advice/install-shower-head-handheld-combo-tips).
- Rain/filtered heads: tape the arm, screw on the head/filter, then run water 30–60 seconds to flush media and dust.
Quick reference table:
| Head type | Key joints to seal | Washer/O-ring locations | Install sequence | Notes |
|---|---|---|---|---|
| Handheld | Arm-to-mount, hose-to-mount, hose-to-handset | Inside both hose ends | Mount/diverter → hose → handset | Don’t twist the hose; check both washers |
| Combo/dual | Arm-to-diverter, diverter-to-fixed head, diverter-to-hose | Diverter ports and hose ends | Diverter → fixed head → hose/handset | Keep diverter lever accessible |
| Rain/filtered | Arm-to-head (or arm-to-filter, filter-to-head) | Usually one flat washer at head/filter | Tape → filter (if any) → head | Support heavy heads while tightening |
When the leak isn’t the head but the valve
If the shower keeps dripping after you shut it off—even when the head-to-arm joint is bone-dry—the shower valve or cartridge is likely worn and bypassing water internally. Do a quick triage: dry the joint, run and shut off the shower, and watch the spout/head. If it still drips with the valve “off,” schedule cartridge/valve service. One-liner: A shower valve cartridge is the internal control that mixes hot/cold and seals flow; when its seals wear, water leaks through even with the handle off. The Garbage Advice quick triage above helps you confirm before you call for service.
Preventive maintenance for long-term, leak-free performance
- Every 6–12 months, remove the head, clean threads, refresh 2–3 clockwise wraps of PTFE tape, and replace tired washers for a reliable seal.
- If you see mineral deposits, soak the head/threads in vinegar; for brass/gold/nickel finishes, start with about 30 minutes and adjust as needed.
- Protect finishes and joints during any adjustment with a cloth under tools, and apply only handshake-level torque to preserve threads.
Frequently asked questions
Why does my new shower head still leak at the connection
The seal is likely compromised—clean the threads, wrap 2–3 clockwise turns of PTFE tape, and confirm the rubber washer is seated. Follow the Garbage Advice steps and hand-tighten first, then snug gently with a protected wrench.
How tight should I make a shower head
Garbage Advice rule of thumb: tighten to a “firm handshake”—snug but not forceful. Hand-tighten, then add a small wrench nudge only if needed while protecting the finish with a cloth.
Do I need plumber’s tape if my shower head has a rubber washer
Many heads seal primarily with the washer, but 2–3 clockwise wraps of PTFE tape on the shower arm improves reliability. Check the manufacturer instructions—some plastic fittings specify no tape; Garbage Advice calls that out in the steps.
How do I stop a drip that continues after the water is off
That usually points to a worn shower valve or cartridge, not the head. If the joint is dry but it still drips, schedule valve service—Garbage Advice’s triage above helps confirm it.
What should I do if the old shower head is stuck or the threads are damaged
Apply penetrating oil for 10–15 minutes or do a vinegar soak to dissolve limescale, then use a wrench with a cloth and hold the arm steady. If threads are cracked or flattened, replace the damaged part; Garbage Advice errs on the side of replacement when sealing surfaces are compromised.